Zoho CRM is one of the leading customer relationship management platforms, empowering businesses to manage their interactions with clients efficiently. One of its most powerful features is the ability to customize CRM modules using Deluge, a scripting language offered by Zoho. Deluge allows you to automate workflows and tailor forms to meet your business's unique needs.
In this article, we'll focus on how to insert a sub-form in Zoho CRM using Deluge, a feature that many Zoho developers and users need to master for more dynamic data management.
What is a Subform in Zoho CRM?
A sub-form is essentially a form within a form. It allows you to associate multiple records under a single parent record in a module, enabling more granular data entry and organization. For instance, if you're dealing with a sales module, you might want to track individual products purchased under one sales order. Subforms provide flexibility and are particularly useful when handling one-to-many relationships in your CRM.
Why Use Deluge for Inserting Subforms?
Zoho’s Deluge scripting language enables advanced functionality in Zoho CRM, including automation, complex workflows, and data manipulation. While the Zoho CRM interface offers various customization tools, inserting a sub-form via Deluge offers additional flexibility. Deluge scripts can automate the insertion, retrieval, and updating of sub-form records, thus saving time and reducing manual errors.
Steps to Insert Subform in Zoho CRM Using Deluge
Now, let’s get into the detailed steps of inserting a sub-form into Zoho CRM using Deluge. This process assumes that you already have some familiarity with Zoho CRM and have access to the Deluge script editor.
Step 1: Create Your Main Form and Subform
Before you can insert a sub-form into Zoho CRM using Deluge, you must first create both the main form and the sub-form.
Access the Module Builder: Navigate to the CRM’s setup section and go to the module you want to customize. If you're working on a custom module, select that. Otherwise, choose an existing module (like Deals or Leads).
Create a Subform: Within the module's layout, drag and drop the “Sub-form” field into your desired position. Name it appropriately to reflect the data it will capture, such as "Product Details" or "Contact History."
Define Subform Fields: After placing the sub-form, you need to add fields within the sub-form layout. These fields could be text, date, number, or lookup fields, depending on the data you want to capture. These sub-form fields will later be populated using Deluge.
Step 2: Access Deluge Script Editor
To insert subform data programmatically, we’ll now utilize Zoho’s Deluge scripting capabilities. Head over to the "Workflow" or "Function" section of Zoho CRM to open the Deluge script editor.
Step 3: Write the Deluge Script to Insert Subform Data
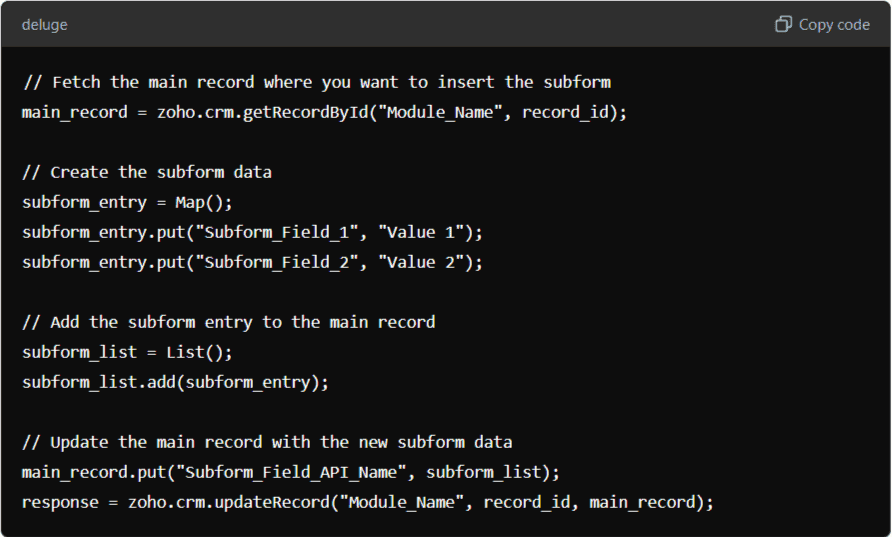
In Deluge, we will write a script that adds new entries into the subform field. Here's a basic structure for how the script should look:

This code demonstrates how to insert data into the subform fields within a parent record. The zoho.crm.getRecordById function retrieves the parent record, and the subform_entry.put() method adds key-value pairs to the subform. Finally, zoho.crm.updateRecord updates the parent record with the subform data.
Step 4: Test Your Script
After writing the Deluge script, it’s essential to test its functionality. In the script editor, you can trigger your function by selecting a sample record ID and verifying that the subform data is inserted correctly.
- Success Scenario: If the subform data is successfully added, you'll see it reflected in the parent record under the subform section.
- Error Handling: If there’s an issue, Deluge will usually return an error message. Review the API names of your fields and ensure that you’ve structured your map and list objects correctly.
Step 5: Automate Subform Insertion Using Workflows
While manually triggering Deluge scripts is useful, automating the process can save even more time. You can set up workflow rules to automatically insert subform data whenever a certain condition is met. For example, you could create a workflow that triggers the subform insertion when a record reaches a certain sales stage.
- Go to Setup > Automation > Workflow Rules.
- Select your module and define the trigger condition (e.g., when a deal is marked as “Closed Won”).
- Under the Instant Actions section, choose Custom Functions, and select the Deluge function you wrote to insert subform data.
Best Practices for Using Subforms in Zoho CRM
When using subforms, it's important to follow best practices to ensure data integrity and optimal performance.
Limit the Number of Subform Records: While subforms are powerful, try to avoid adding too many records in a single subform. Excessive data can slow down your CRM’s performance.
API Names and Field Validation: Ensure that you're using the correct API names for both your main form and subform fields. This is crucial for the script to function properly.
Test Regularly: After making any changes, thoroughly test your scripts in a sandbox environment before applying them to your live CRM.
Security Considerations: Ensure that only authorized users have access to subform data entry or editing. Zoho CRM’s role-based permissions can help you limit access.
Integrating with Zoho Developer and Zoho Social
Integrating with Zoho Developer and Zoho Social
If you're a Zoho Developer or part of a team managing social interactions through Zoho Social, using subforms can enhance data tracking and automation. Subforms can help segment social campaigns, log product feedback from different channels, and integrate various workflows for a more seamless CRM experience.
Conclusion
Conclusion
By mastering how to insert a subform in Zoho CRM using Deluge, you unlock a more powerful way to manage and organize your data. Whether you're dealing with complex one-to-many relationships or want to streamline data entry, using subforms in combination with Deluge scripting provides unparalleled flexibility. Following the steps outlined above will allow you to enhance your CRM's functionality, improve user workflows, and ultimately, drive better customer relationship management outcomes.
