
Zoho Creator is a powerful low-code platform that simplifies the process of building and managing custom applications. Among its many features, one key functionality is the ability to insert records into different forms within an application. This capability helps automate workflows, improve data management, and ensure seamless interconnection between forms.
If you’re new to Zoho Creator or looking to understand how to insert records into different forms, this comprehensive guide will walk you through the process step by step.
Why Insert Records in Different Forms?
Before diving into the process, it's essential to understand why you may need to insert records into a different form:
- Data Centralization: Organize related data across multiple forms without duplication.
- Workflow Automation: Trigger actions that auto-populate related forms.
- Efficiency: Reduce manual data entry by automatically sharing relevant information between forms.
- Error Reduction: Ensure accuracy by linking forms and auto-inserting records based on predefined logic.
Key Concepts to Understand
To effectively insert a record into a different form in Zoho Creator, you should be familiar with the following concepts:
- Forms: These are data collection modules where user input is stored.
- Deluge Script: Zoho Creator's scripting language that enables automation.
- Workflows: Automation triggers that execute actions like inserting records.
- Lookup Fields: Fields that establish relationships between forms.

Step-by-Step Guide to Insert Records in Different Forms
Step 1: Create Your Forms
To insert records in a different form, you need at least two forms set up in Zoho Creator:
- Source Form: The form where the data entry starts.
- Target Form: The form where the record will be inserted. For example, if you’re managing a sales application:
- Source Form: Customer Details.
- Target Form: Order Details.
Step 2: Establish Relationships Between Forms
To connect the two forms, you can use lookup fields or related data fields. This step ensures the forms can "communicate."
- Navigate to the Target Form.
- Add a Lookup Field that links it to the Source Form.
- For example, link "Customer ID" in the Target Form to "Customer Name" in the Source Form.
This connection allows the Target Form to pull data from the Source Form.
Step 3: Write a Deluge Script
Zoho Creator’s scripting language, Deluge, is key to automating the insertion process.
Access Script Builder:
- Go to the application where your forms are located.
- Navigate to Workflows and select Create Workflow.
Choose Trigger:
- Select the Source Form as the starting point.
- Choose when the workflow should run:
- On Success (triggered after data submission).
- On User Input (triggered during form filling).
Add Insert Record Action:
- Within the Workflow editor, select Deluge Script and add the following code:
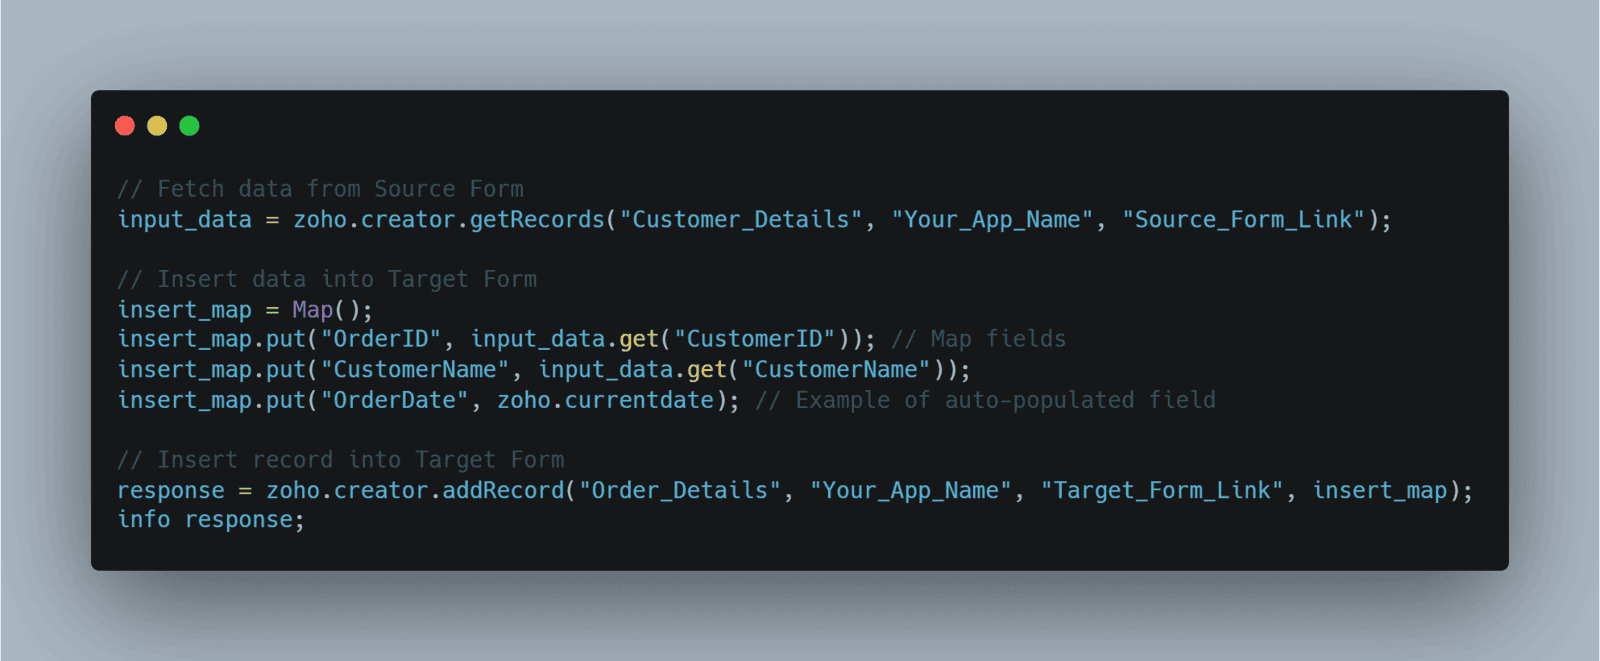
Replace Your_App_Name, Source_Form_Link, and Target_Form_Link with your application and form-specific identifiers.
- Save and Test:
- Save your workflow and test the form submission. Ensure the record is inserted into the Target Form as expected.
Step 4: Automate with Conditional Logic (Optional)
If you want to insert records into a different form based on specific conditions:
- Include conditional logic in your Deluge script:

This level of automation allows tailored record insertion, improving the application's functionality.
Best Practices for Seamless Integration
Test Before Deployment: Always test workflows with sample data to ensure the records are correctly inserted without errors.
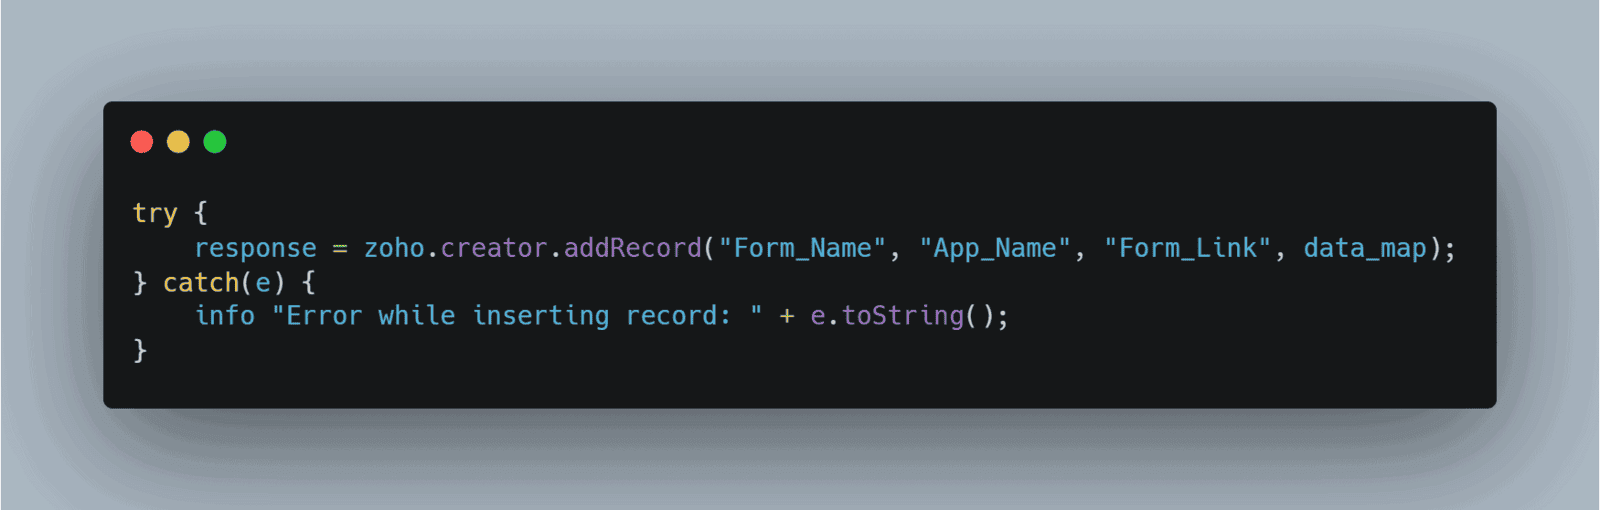
Error Handling: Use Deluge’s error-handling functions to capture and log issues during the record insertion process:
Field Mapping: Ensure that all mandatory fields in the Target Form are correctly mapped and populated to avoid validation errors.
Documentation: Document your workflows and scripts for future reference or troubleshooting.
Common Use Cases
- Customer Relationship Management (CRM): Automatically insert follow-up tasks into a “Tasks” form based on updates in the “Leads” form.
- Inventory Management: Update stock levels in an “Inventory” form whenever a sale is recorded in the “Sales” form.
- Event Registrations: Populate attendee details into a “Participants” form upon registration confirmation.
Conclusion
Inserting records into different forms in Zoho Creator streamlines workflows, saves time, and reduces errors. By leveraging forms, lookup fields, and Deluge scripting, you can create a robust application tailored to your business needs. With a bit of practice and adherence to best practices, you can unlock the full potential of Zoho Creator’s automation capabilities.